· Mohammad AbouElSherbini · 14 min read
Intro to containerization
Containerization is a lightweight form of virtualization that packages an application and its dependencies into a container

Intro to containerization
By: Mohammad AbouElSherbini 💀
Intro
Did you ever face one of these issues?
- A program doesn’t support your specific OS
- Installing a program is too complicated and requires lots of dependancies
- Your code stopped working after reinstalling OS
- Your code doesn’t work on your friend’s PC
- Your client complains about some issues that work correctly on your machine
Why do they happen?
- Programs require other programs to function properly
- Programs expect certain things from the host environment
- Programs expect certain initialization sequences
How do we solve this?
- We need programs to specify their dependencies explicitly
- We need a reliable way to satisfy these dependencies
- We need some way to specify initialization sequences explicitly
Solutions
1. Virtualization
Virtualization creates virtual representations of servers, storage, networks, and other physical machines letting your PC emulate an operating system.
Now on that system you can install programs and share a copy of that virtual OS
2. Containerization
Containerization is a process of packaging your application together with its dependencies into one package (a container)
Now it can be run in isolated user space on the same shared operating system
Containerization vs Virtualization

| Aspect | Containerization | Virtualization |
|---|---|---|
| Definition | Encapsulation of an application and its dependencies into a container that runs on a shared OS kernel. | Abstraction of physical hardware to run multiple VMs, each with its own OS. |
| Architecture | Uses a shared operating system kernel, with isolated user spaces. | Each VM runs its own full operating system on top of a hypervisor. |
| Resource Overhead | Lightweight: only the application and necessary binaries/libraries are included. | Heavy: each VM includes a full OS and corresponding system resources. |
| Boot Time | Faster (milliseconds to seconds). | Slower (minutes to boot due to full OS initialization). |
| Isolation | Process-level isolation (shared OS kernel). | Full isolation at the hardware level (separate OS for each VM). |
| Efficiency | High resource efficiency due to shared kernel and minimal overhead. | Lower efficiency because each VM uses a separate OS, consuming more resources. |
| Scalability | More scalable; allows running many containers on a single host. | Less scalable due to resource overhead of full OS in each VM. |
| Portability | High portability across different environments as long as the host OS supports containers. | Less portable; each VM includes its own OS, making movement between environments more complex. |
| Use Case | Ideal for microservices, CI/CD pipelines, and cloud-native apps. | Useful for running multiple different OS types on the same hardware (e.g., Windows, Linux). |
| Security | Weaker isolation since containers share the same OS kernel, potentially allowing cross-container vulnerabilities. | Stronger isolation due to independent OS instances in each VM. |
| Examples | Docker, Kubernetes, Podman. | VMware, VirtualBox, KVM, Hyper-V. |
Docker
What is docker?
- Docker is a platform that allows developers to package, distribute, and run applications in isolated containers.
- Containers are standalone packages that include everything needed to run an application.
- Docker makes it easy to build and manage these containers across different environments.
- Docker provides a consistent and portable way to package and deploy applications.
Overview

- Each app is a container running in isolation.
- The same app can be run multiple times on multiple containers.
- We call the blueprint/template used to create the App an Image while we call the running App a Container
How it works
- Docker is just a way to share applications. Just like git is used to share source code.
- It allows the user to write the steps to generate the application like a recipe.
- Then it can follow that recipe to ALWAYS get the same results independent of the underlying environment.

git push? =>docker push mksherbini/awesome-appgit pull? =>docker pull mksherbini/awesome-appmvn clean package java:exec? =>docker run mksherbini/awesome-app
- Having a unified recipe allows it to run consistently the same way across environments, machines, and cloud providers.
- We write this recipe in a dockerfile

- Create a docker image by specifying the steps to create it from scratch
- Can start FROM an existing image as the base for your image
- COPY data either from outside docker or from other docker stages
- RUN any command or script
Literally do everything from scratch but this time you only do it once
So…
- The “It runs on my machine excuse” no longer works here :))
- Now it run on our machine

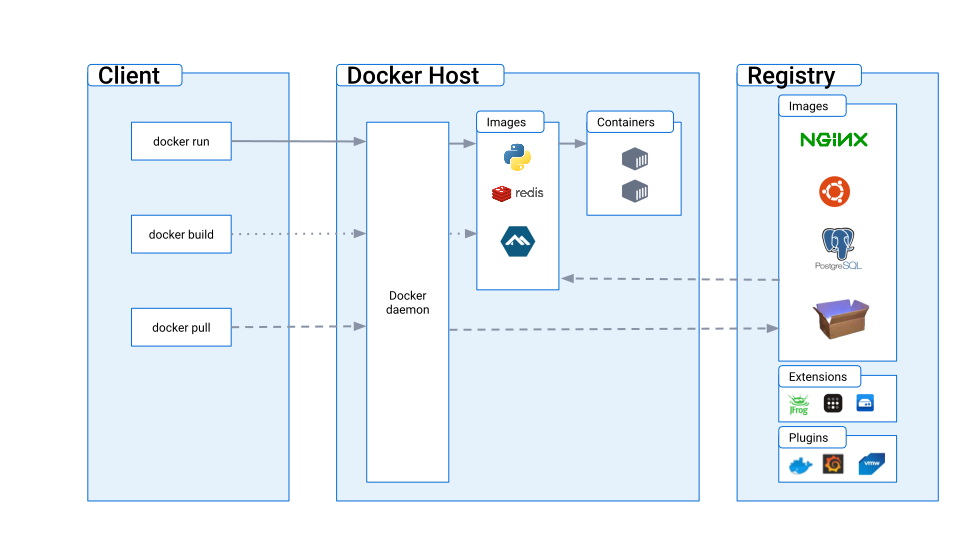
Docker Objects
When you use Docker, you are creating and using objects like:
- Images: is a read-only template with instructions for creating a Docker container.
- Containers: is a runnable instance of an image.
- Volumes: is a way to persist data outside of a container’s file system.
- Networks: is a way to connect containers together, or to the host network or other external networks.
- Registry: is a repository for storing and distributing Docker images.
- Plugins: used in a build tool such as Maven or Gradle to automate the build, deployment and running of Docker containers.
Docker Images
Is a read-only template with instructions for creating a Docker container.
- Created from a dockerfile.
- Built using a series of read-only layers. Each layer represents an instruction in the Dockerfile.
- When a new image is created, only the layers that have changed are rebuilt.
- if two images are based on the same base image, they can share the same layers, which reduces the overall size of the images.
- This makes the process very efficient, as it avoids unnecessary rebuilds and duplications.
Commands
docker imagesordocker image ls: Lists all images on your local Docker host.docker pull <image_name>: Downloads an image from a registry (e.g., Docker Hub)docker push <image_name>: Pushes an image to a registry (requires authentication)docker build -t <image_name> .: Builds a new image from a Dockerfile in the current directorydocker rmi <image_name>: Removes an image
Docker Containers
Is a lightweight and portable executable package of software that includes everything needed to run an application, such as code, libraries, and system tools.
- Based on Docker Images.
- Containers are isolated from each other and from the host system, providing a secure and consistent runtime environment.
- Containers can be easily deployed and scaled, making them ideal for modern, distributed applications.
Commands
docker run (-d)(--rm)(--name <container_name>)(-p <host-port>:<container-port>) <image_name>: Creates and runs a container from an imagedocker psordocker container ls(-a): Lists all running containersdocker stop <container_name>: Stops a running containerdocker start <container_name>: Starts a stopped containerdocker exec -it <container_name> (bash or sh): Opens a terminal session inside a running containerdocker rm <container_name>: Removes a stopped container
Docker Networks
Is a way for Docker containers to communicate with each other and with the outside world.
- It provides a layer of isolation and control over how containers interact on a network level.
- Main networks types:
- Bridge network (default): containers are isolated from the host machine’s network
- Host network (less isolation): containers share the host machine’s network
- None: Completely isolate containers
- Overlay networks: for multi-host communication, connect multiple Docker daemons together as if they were on the same network
Commands
docker network ls: Lists all networksdocker network create my-network: Creates a new networkdocker network connect my-network <container_name>: Connects a container to a networkdocker network disconnect my-network <container_name>: Disconnects a container from a networkdocker network rm my-network: Removes a network (only if no containers are connected)
Docker Volumes
Is used to persist data within Docker containers
- Volumes are managed independent of containers.
- Unlike the container’s internal filesystem, which is ephemeral, volumes allow data to be written and retained (Stateful).
- A single volume can be mounted to multiple containers, allowing them to share data.
- Main volumes types:
- Host volumes: maps a path from the host
/path/on/host:/path/in/container - Named volumes: generates a docker handle with given name where the files are stored
name:/path/in/container - Anonymous volumes: generates a unique docker handle where the files are stored (subfolders)
/path/in/container
- Host volumes: maps a path from the host
Commands
docker volume ls: Lists all volumesdocker volume create my-volume: Creates a new volumedocker run -v my-volume:/data <image_name>: Runs a container with a mounted volumedocker volume inspect my-volume: Shows detailed information about a volumedocker volume rm my-volume: Removes a volume (only if not in use by any containers)
tldr;
- A Dockerfile is used to build a Docker image.
- Docker image is the actual packaged and executable version of the application that can be run in a Docker container.
- As containers are isolated we use volumes and networks to connect together only the required parts.
- Use Networks to connect containers together or provide access to other networks.
- Use Volumes to persist data or share it between containers.
- Upload result to a Registry like docker hub
- Automate this process using Plugins
General Commands
docker info: Displays information about the Docker daemondocker version: Shows the Docker client and server versiondocker system df: Displays information regarding the amount of disk space used by the Dockerdocker system prune: Removes unused Docker resources (images, networks, volumes)docker inspect <object-id>: Provides detailed information on Docker objects
Docker architecture
- Docker uses a client-server architecture.
- The Docker client talks to the Docker daemon, which does the heavy lifting of building, running, and distributing your Docker containers.
- The Docker client and daemon can run on the same system, or you can connect a Docker client to a remote Docker daemon.
- The Docker client and daemon communicate using a REST API, over UNIX sockets or a network interface.
- Another Docker client is Docker Compose, that lets you work with applications consisting of a set of containers.
Docker desktop

- Docker Desktop is a one-click-install for Mac, Linux, or Windows.
- Includes both the Docker client and the Docker daemon.
- It includes a graphical user interface and command-line tools for managing containers and images
- It takes care of port mappings, file system concerns, and other default settings, and is regularly updated with bug fixes and security updates.
- Developers can build and test applications in a consistent and isolated environment, and then deploy them to any platform that supports Docker containers.
Labs
- Try everything
- Make sure you understand it, not just trying :)
- Try again, you probably didn’t fully understand it the first time
- Explore dockerhub and try images like
Dockerfile
- A Dockerfile is a text file that contains a set of instructions used to build a Docker image
- It provides a consistent and repeatable way to build and package applications in containers
- Consists of a series of commands and arguments used to create a Docker image
- Can be version controlled, shared, and reused by developers
- It is a key element of the Docker build process and enables the creation of portable and scalable containerized applications
Instructions
- FROM: Sets the base image for the Dockerfile.
- MAINTAINER: Sets the author of the Dockerfile.
- RUN: Executes a command in the Docker image.
- COPY: Copies files from the host machine to the Docker image.
- ADD: Like COPY but can handle remote URLs or extract archives.
- EXPOSE: Hints to Docker that the container will listen on the specified network ports at runtime.
- ENV: Sets environment variables for the Docker image.
- WORKDIR: Sets the working directory for the Docker image.
- CMD: Specifies the default command to run when the container is started.
- ENTRYPOINT: Configures the container to run as an executable.
Variables
In a Dockerfile, ENV and ARG are both used for defining variables, but there are some key differences between them.
ENV sets an environment variable that will be available during the build and at runtime in the container. It can be used to set default values for environment variables that will be used by the application running inside the container. ENV values can also be overridden at runtime using the
-eoption when running the docker run command.ARG is used to define variables that are only available during the build. These variables can be overridden at build time using the
--build-argoption when running the docker build command.You can assign an ENV variable a value from ARG to persist it
- We can use CMD after ENTRYPOINT to specify a default behavior.
- After EXPOSE you still need to assign the port mapping in container.
- ENTRYPOINT is set during the build time so it does not have access to the value of environment variables set at runtime.
- RUN adds a layer, while ENTRYPOINT and CMD don’t.
- If stage names are not set, they follow the default naming convention with numbers starting from 0.
Examples
- Want to run a java application in docker? Sure
FROM  openjdk:17-jdk-alpine
EXPOSE 8080
COPY  ./target/*.jar  service.jar
ENTRYPOINT java -jar /service.jar- Oh you want to package it first? Sure
FROM  maven:3-openjdk-17-slim
COPY  .  /app/project
RUN  mvn  -f  /app/project/pom.xml  clean  package
Your build requirements change? No problem
FROM  maven:3-openjdk-17-slim
ARG  SPRING_ACTIVE_PROFILE // build time variable
ENV SKIP_TESTS // runtime variable
COPY  .  /app/project
RUN mvn -f /app/project/pom.xml clean package -DskipTests=${SKIP_TESTS} -P ${SPRING_PROFILES_ACTIVE}- What if you want to compile and package? ez
FROM  maven:3-openjdk-17-slim
COPY  .  /app/project
RUN  mvn  -f  /app/project/pom.xml  clean  package
ENTRYPOINT  java  -jar  /app/project/target/app.jar
But… is this the correct way to do it?
- Although maven:3-openjdk-17-slim already has java, that doesn’t mean we should run our app there.
- Why? Because we would have maven on our app container when we would never need it + the source code and package results
- When all we need is the jdk + jar file
- We should always try to minimise and clean our container
- So we don’t want the maven part but we still want to compile the code to produce the jar
- How can we do it?
Multi-stage
- Docker multistage builds are a feature that allows you to create smaller and more efficient Docker images by building and packaging your application in multiple stages.
- Each stage of the build process can produce its own intermediate image, and these images can be used to build the final image that will be deployed as a container.
- This approach allows you to minimize the size of your final Docker image by discarding any unnecessary build artifacts or dependencies that are only needed during the build process.
- Can also run faster as independent stages can to run concurrently.
Examples
FROM  maven:3-openjdk-17-slim as build // give it a name
COPY  .  /app/project
RUN  mvn  -f  /app/project/pom.xml  clean  package
FROM openjdk:17-jdk-alpine
EXPOSE 8080
COPY --from=build /app/project/target/*.jar service.jar // copy from build
ENTRYPOINT java -jar /service.jarDocker compose
Docker Compose is a tool for defining and running multi-container Docker applications.
- It allows you to define all the services that make up your application in a YAML file, along with their configurations and dependencies, and run them all with a single command.
- Compose is particularly useful for complex applications that require multiple containers, such as those with a web server, application server, and database.
- Next to a file named “docker-compose.yml”. Use
docker-compose upto start all services,docker-compose downto stop and remove them,docker-compose buildto build them,docker-compose pullto download/update them. - A common way to do this is:
docker-compose pull && docker-compose up
Syntax
- version: specifies the version of the Compose file syntax
- services: defines the different containers or services that make up the application
- image: specifies the Docker image to use for the container
- build: provides the path to the Dockerfile to build the image from
- ports: maps the container’s ports to the host’s ports
- environment: sets environment variables for the container
- volumes: maps the container’s volumes to the host’s file system
- networks: sets up the network connections between containers
Example
This pulls the image from docker hub and sets it up using provided config and variables in .env
- docker-compose.yml
services:
  vpn:
    container_name: vpn
    image: dperson/openvpn-client:latest
    cap_add:
      - net_admin # required to modify network interfaces
    restart: unless-stopped
    volumes:
      - /dev/net:/dev/net:z # tun device
      - ${ROOT}/config/vpn:/vpn # OpenVPN configuration
    security_opt:
      - label:disable
    ports:
      - 8112:8112 # port to be reachable from local network
    command: '-f "" -r 192.168.1.0/24' # enable firewall and route local network traffic

  qbittorrent:
    container_name: qbittorrent
    image: linuxserver/qbittorrent:latest
    restart: unless-stopped
    network_mode: service:vpn # run on the vpn network
    extra_hosts:
      - "host.docker.internal:host-gateway"
    ports:
      - 8113:8113
      - 6881:6881
      - 6881:6881/udp
    environment:
      - UMASK=0
      - PUID=${PUID} # default user id, defined in .env
      - PGID=${PGID} # default group id, defined in .env
      - TZ=${TZ} # timezone, defined in .env
      - WEBUI_PORT=8113
    volumes:
      - ${ROOT}/downloads:/downloads # downloads folder
      - ${ROOT}/config/qbittorrent:/config # config files

  readarr:
    container_name: readarr
    image: linuxserver/readarr:develop
    restart: unless-stopped
    extra_hosts:
      - "host.docker.internal:host-gateway"
    ports:
      - 8787:8787
    environment:
      - UMASK=0
      - PUID=${PUID} # default user id, defined in .env
      - PGID=${PGID} # default group id, defined in .env
      - TZ=${TZ}
    volumes:
      - ${ROOT}/config/readarr:/config
      - ${BOOKS_PATH}:/books
      - ${ROOT}/downloads:/downloads
- .env
PUID=0
PGID=0
TZ=EG
ROOT=.services:
frontend:
image: example/webapp
build: ./webapp
backend:
image: example/database
build:
context: backend
dockerfile: ../backend.Dockerfile
custom:
build: ~/custom- awesome/webapp docker image is built using webapp sub-directory within Compose file parent folder as docker build context. Lack of a Dockerfile within this folder will throw an error.
- awesome/database docker image is built using backend sub-directory within Compose file parent folder. backend.Dockerfile file is used to define build steps, this file is searched relative to context path, which means for this sample .. will resolve to Compose file parent folder, so backend.Dockerfile is a sibling file.
- a docker image is built using custom directory within user’s HOME as docker context. Compose implementation warn user about non-portable path used to build image.
On push, both awesome/webapp and awesome/database docker images are pushed to (default) registry. custom service image is skipped as no Image attribute is set and user is warned about this missing attribute.
Installing rabbitmq using docker
https://hub.docker.com/_/rabbitmq
Using docker run
$ docker run
    -d    // Run in Detached-Mode / Background
    --hostname rabbitmq     // Used when running multiple instances
    --name rabbitmq    // Container Name
    -p 5672:5672   // RabbitMQ Server Port
    -p 15672:15672    // Management Console Port
    rabbitmq:3.11-management   // image-name : tag-name
Default username and password: ( guest / guest )
Using docker compose
version: '3.7'

services:
    rabbitmq:
      container_name: rabbitmq
      hostname: rabbitmq
      image: rabbitmq:3.11-management
      restart: unless-stopped
      ports:
      - 5672:5672   #RabbitMQ Server Port
      - 15672:15672 #Management Console Port
      environment:
      - RABBITMQ_DEFAULT_USER=admin
      - RABBITMQ_DEFAULT_PASS=admin
      volumes:
      - ./log:/var/log/rabbitmq
      - ./data:/var/lib/rabbitmq/mnesia
Labs
- Create a dockerfile to build and package a java application
- Create a dockerfile to prepare the frontend
- Make any request from one backend container to another backend container
- Combine in a docker-compose
- Push to docker hub.
- Download and run directly
- Use docker compose with rabbitmq and your application